The HTML element canvas is not supported. Please use a modern browser. The HTML element canvas is not supported. Please use a modern browser. The HTML element canvas is not supported. Please use a modern browser. The HTML element canvas is not supported. Please use a modern browser.
== Load project==
== Pipe distribution ==
== Hints/Errors ==
== Trenchplanner - Layout of Ring Trench Collectors for brine heatpumps ==

Ring Trench Collector

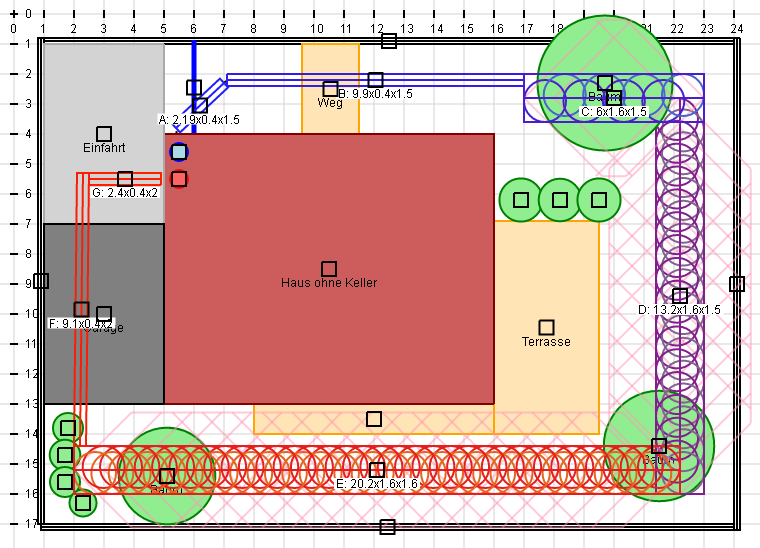
The Ring Trench Collector (also known as slinky geothermal loops in a trench) is a simple to build and space saving heat source for brine heatpumps. This Software can be used for interactive planning as a painting software. First you have to draw the garden including borders, house, garage or carport, terrace, water pipes and other important attributes. After that you could place the brine manifolds (preferred inside the house next to the heatpump) and a possible layout for the Ring Trench Collector. As you have given the heating load, the soil type and the standard outside temperature in the project window the heating power of the collector could directly be calculateed.

Advantages of the Ring Trench Collector

  • Geothermal energy could be used even on small estates
  • Much more cheaper than a geothermal drilling, cheaper than a conventional horizontal collector
  • Own work for price reducing easy possible
  • More soil volume is accessible compared to a horizontal collector with less excavation work
  • More pipe meters compared to a drilling or a horizontal collector
  • Turbulent flow with better heat transfer compared to the horizontal collector
  • With comprehensive simulations verified dimensioning recommendations
  • Planningtools, support and various field reports available
  • Individual plannung and dimensioning fitting exaclty to the requirements
  • In Germany the BAFA supports brine heatpumps with up to 6750 EUR
Logo of the Ring Trench Collector

Windows of this program

The functionality is spread on different windows. These will be presented here. You can open all of them with the Menu->Window.


Collection of the base information as location, soil type, standard outside temperature, count of pipes and heating load of the house.
All elements you can use for your drawing like house, terrace, water pipe, parts of the collector can be chosen and adjusted.
The parts of the collector will be assigned with a different amount of pipe. All parts are shown in a table.
After fixing the project information the dimension chart shows possible Ring Trench Collector dimensions for an overview.
If you have an EnEV-calculation it is possible to estimate the heating load.
Setting like your username independent of your projects.

Manual

You can use windows as known from desktop programs. With a drag of the title you can move a ccomplete window. In the right upper corner you find an X for closing each window. With the menu which will be shown in the left upper corner after closing this intro window you can reopen all closed windows.

Calculate the heating power of a collector

After you place a cold and a warm brine manifold in the drawing the program tries to connect all collector parts on the shortest way from cold to warm to form the collector. With the coloring from blue to red you can see the temperature gradiation from cold to warm inside the collector. As soon as it is possible to route a connection from the cold to the warm brine manifold, the possible heating load and the worst case brine temperatures will be shown for this collector layout in the project window.

Save and publish the drawing

The drawing can be saved locally or on the public server of the Heatpump Consumption Database (see the file menu). On your local computer you can only store one single drawing. As you store a drawing on the server, you will get the URL (find it under the menu) after it has been saved successfully. With this URL you can retrieve the drawing later. A complete Overview shows all currently saved drawings of all users. If you want to find your own drawings you have to define your user name (see Menu->Window->Settings). With the URL you can show drawing to other experienced users in typical internet forums like Haustechnikdialog.de in Germany or Energiesparhaus.at in Austria.

== Dimension chart ==

This table shows you the length needed depending on width and depth of the collector.

Green = less excavation volume, red = more excavation volume

== Heating load help ==

Heating load estimation based on the EnEV calculation

The heating load shows how much heating energy a building loses at standard outside temperature. This is exactly the power a heating installation must provide to keep the temperature on the same level at standard outside temperature. The heating load should be calculated by an expert using the EN 12831. Especially the dimensioning of an underfloor heating needs a detailed room-by-room calculation of the heating load. And the heatpump has to be chosen depending on the heating load, too. The heating load calculation should contain:

Transmission heat losses Heat disappearing through walls, flooring, closed windows and doors and roof.
Ventilation heat losses Heat escaping through open windows or by ventilation. If installed a system for controlled domestic ventilation with heat recovery
has to be considered with heating load calculation.
Domestic hot water production losses If the heatpump should produce the domestic hot water for kitchen, bath and shower, it should be added
to the heating load. As an approximate value use 100 W per person or 12,5 kWh per year and squaremeter floor.

Values, that should not be included in the heating load calculation:

Reheating losses A heatpump in a modern house should run day an night at a similar level as you don't have reheating losses.
Fear reserve A heatpump can only work efficient if it is dimensioned exactly. Oversizing leads to too much electric power
consumption all the time.
Possible disconnecting times Depending on the electricity tariff usually it is not needed to use a special heatpump tariff for a
small brine heatpump. The simple domestic electricity tariff fits best for most purposes and doesn't need
an additional base fee.

Important: Many heating load approximations done by heating engineers are inexact and are not fitting to your wishes as the user of the building. Often the heating load is calculated too high. The heating engineer is rarely the right person to calculate the heating load. A planner for technical building equipment or a structural engineer would be the better choice for exact heating load calculations.

It is possible to estimate the heating load for the dimensioning of the heatpump by some parameters of the EnEV calculation. The result normally is close to the official heating load calculation (EN 12831) with less than 5% deviation. Its accuracy is enough for choosing the right heatpump and dimensioning the collector. For planning the heating surfaces and the ventilation you need the room-by-room calculation provided by the EN 12831.

Standard outside temperature

Depending on the location of the building the standard outside temperature differs. Simplified it is the average outside temperature of the coldest 48 successive hours in a cold winter). This software supports most locations in Germany and Austria and knows their standard outside temperatures. If your location is not supported please give the standard outside temperature directly or use this map of Germany to choose the right temperature.

== Heating load estimation ==
Please give the location or the standard outside temperature inside the project window.
HT':
(Heat transmission transfer coefficient
or average coefficient of thermal conductivity)
W/(m²·K) (Please use a dot instead of a comma)
Requested temperature
inside the building:
Grad
A:
(Enveloping surface)
(Surface of all outer walls, roof and bottom plate)
Ve:
(Heated gross volume)

Count of
residents:
Residents (How much people will live in the building?)
Ventilation:

Transmission heat losses: W
+ Ventilation heat losses: W
+ Domestic hot water production losses: W
= Total heating load: W
== Paint elements ==


Length
Width
Depth
Weight
Angle
Permeable
Name
== Project ==
Project
Author
Comment

Place
Longitude
Latitude

Outside temp
Soil type
Count brine pipes

Heating load W
The collector provides
Heating power W
Trench length m
Excavation volume
Worst case brine temperature
in °C
out °C
== Info ==

TrenchPlanner Version 1.67

All details and calculations are without engagement. If you have problems or suggestions feel free to contact

== Settings ==
Username
(this will be shown as you save on the server)

Dimensions of the canvas
Width pixel
Height pixel
(without given values the size of the browser will be used)

== Help: Process for do-it-yourself ==
Needs to be translated, any volunteers?
Inform Up to now the Ringtrenchcollector mostly is a do-it-yourself project. The building owner has to inform himself completely. Start at the Ringtrenchcollector Homepage (German). From here you can reach many planning or base information threads and some videos.
Basic parameters Heatload of the house, norm outside temperature and soil type in 1,5 m depth have to be known for planning a Ringtrenchcollector.
Paint property For fixing of possible Ringtrenchcollectors you need a detailed property plan. Please add gateway, garden shed, pool and water pipes. This TrenchPlanner is the perfect tool for painting your property.
Trench route Try to find out a perfect trench route for your garden. You can get support by experienced trench planners in the Haustechnikdialog.de or Energiesparhaus.at.
Permission? The lower water authority does not know the Ringtrenchcollector. You need to ask them what limitations a flat collector has to conform to. Most of the time you need a distance to property borders of more than one meter and a limited brine choice.
Sponsorship In Germany get in contact to the BAFA first in order to get information about the time you send your proposal. Sponsoring is paid for a heatpump with JAZ from 4.5 (with Ringtrenchcollector, ground heating and modern brine heatpump easy achivable). You can get 4000 EUR, in old buildings more than 6000 EUR and combinations with other sponsorings.
Heating technician Even if the collector is done in do-it-yourself you need a heating (or cooling) technician for installing the heatpump and connecting it to the collector. For the sponsorship by the BAFA you need a heating technician, too.
Heating In a new building you need a ground (or wall) heating with low temperatures (below 35/30°). The lower the heating water temperatures the less the heatpump will consume energy. In an old building with Heizkörpern insulate as much as possible and replace small Heizkörper with bigger ones until you reach maximum heating water temperatures below 45/35°. No buffer for heating water, no (or spare) single room regulations.
Brine pipes Typically you need PE100 RC pipes with an outside diameter of 32 mm and a length of 300 m. Find suppliers (German) and keep in mind that the delivery time can be some weeks. Per 3 kW heating power of the heatpump you need one pipe.
Digger For a new building try to find a huge digger (20 t) with an experienced operator and plan the digging just before start of house building. For an old building the digger has to fit into the garden and needs to be smaller. Die Planung des Grabens sollte an die Baggerschaufelbreite angepasst werden, das beschleunigt den Aushub des Grabens.
Grundstück räumen Die Verlegung eines Ringgrabenkollektors bedeutet große Erdbewegungen, so dass das Grundstück möglichst frei sein sollte. Sowieso abzureißende Altbauten sollten direkt vor der Kollektorverlegung vom Grundstück entfernt werden.
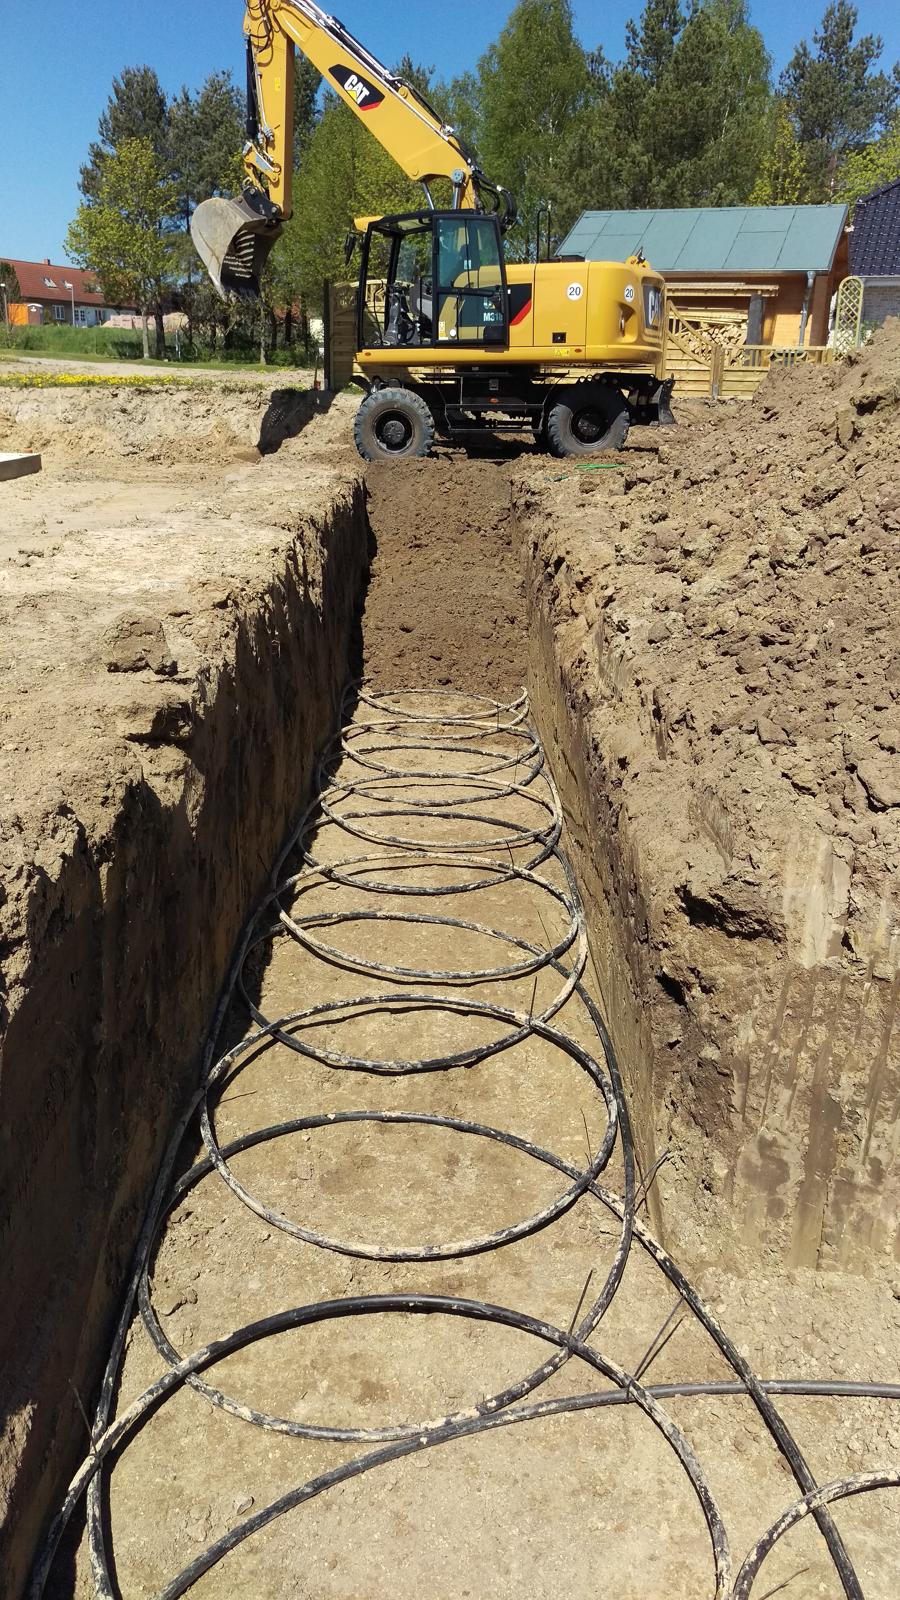
Rohre verlegen Nachdem der Baggerfahrer den Graben ausgehoben hat (dabei die Vorschriften für die Arbeit in Gräben beachten!), werden die Rohre in Schlaufen auf dem Grabenboden verlegt. Dafür ein Ringbund in den Graben stellen, eine Schlaufe fallen lassen, durch verrücken/drehen des Ringbundes die Größe der Schlaufe auf etwas weniger als Grabenbreite anpassen und den Ringbund vorrollen zur nächsten Schlaufenposition. Fertige Schlaufen mit Kabelbindern/Klebeband fixieren. So alle Ringbunde direkt aufeinander im Graben versenken. Bei senkrechtem oder sehr tiefem Graben werden die Schlaufen außerhalb des Grabens vorbereitet und dann vorsichtig im Graben versenkt.
Drucktest Bei noch offenem Graben kann ein Drucktest durchgeführt werden, so dass evtl. Beschädigungen der Rohre ausgebessert werden können. Falls die Fläche des Grundstücks nicht reicht um den Graben auf voller Länge offen zu behalten wird der Drucktest durchgeführt, sobald alle Rohre im Graben verteilt sind.
Verfüllen Direkt auf/neben die Rohre nur Erdreich ohne größere Steine (bis maximal 20 mm Durchmesser). Diese ca. 10 cm dicke Schicht wenn möglich einschlämmen und dadurch guten Kontakt des Bodens zum Rohr herstellen. Danach immer einen halben Meter Boden in den Graben und dann mit einer Rüttelplatte verdichten.
Berichten Damit der Bau eines Ringgrabenkollektors möglichst von vielen nachgemacht wird sollte ein Bericht mit Fotos vom Bau des Ringgrabenkollektors in einem der beiden oben genannten Foren veröffentlicht werden.
Haus vorbereiten Im Neubaufall kann nun der schon vorhandene Bagger die Kellergrube ausheben bzw. die Bodenplatte vorbereiten. Durch die Bodenplatte bzw. Kellerwand können gleich 2 KG-Rohre gelegt werden für die Einführung der Solerohre ins Haus. Im Altbaufall muss eine entsprechnende Einführung der Solerohre vorgesehen werden.
Kellergrubenkollektor Keller bauen, falls einer geplant ist. Direkt bevor die Kellergrube verfüllt wird können die Solerohre in Schlaufen an die abgeböschte Kellergrubenwand gelehnt werden und das warme Ende des Ringgrabenkollektors unterstützen.
Hauseinführung Die Solerohre werden durch vorbereiteten Hauseinführungen geschoben. Je nach Wassersituation muss die Hauseinführung evtl. gegen drückendes Wasser abgesichert werden.
Soleverteiler Im Haus werden die beiden Soleverteiler angebracht und mit den Solerohren verbunden. Ab hier sollte mit dem Heizungsbauer zusammengearbeitet werden. Die Soleverteiler benötigen unbedingt einzeln absperrbare Kreise, sonst kann nicht sinnvoll entlüftet werden.
Befüllung Die Solerohre können nun mit Solekonzentrat befüllt werden. Die Solekonzentration darf dabei nicht zu groß sein, Werte zwischen 20% und 25% bzw. Frostsicherheit bis -9 Grad sind sinnvoll.
Anbindung Wärmepumpe Im Optimalfall steht die Wärmepumpe direkt neben den Soleverteilern. Sonst auf möglichst wenig Winkel im Rohrverlauf und wenig Druckverlust achten.
Wärmepumpe Jedes moderne Gerät mit COP ab 4,7 ist passend. Die Heizleistung sollte nur knapp über der Heizlast des Hauses liegen.
Inbetriebnahme Wird durch den Heizi oder den WP-Hersteller durchgeführt.
Estrichausheizung Für einen Neubau ist die Ausheizung des Estrichs per Sole-WP die kostengünstigste Möglichkeit, den Estrich zu trocken. Bei sinnvoller Auslegung des Ringgrabenkollektors reicht dessen Leistung auch im Winter, ohne dass der Kollektor oder die WP darunter leiden. Bei einer sehr kleinen WP kann die Heizleistung zu schwach sein, so dass etagenweise vorgegangen werden sollte. Hierbei muss die Soletemperatur täglich überwacht werden und der Estrich nur wenige Grad mehr erhitzt werden als im normalen Heizbetrieb zu erwarten.
WP-Verbrauchsdatenbank Nach Inbetriebnahme ist eine Dokumentation der Anlage und der Verbräuche in der Wärmepumpen-Verbrauchsdatenbank sehr empfehlenswert.
Optimieren Während des ersten Winters sollte ein eigenhändiger ausführlicher hydraulischer Abgleich durchgeführt werden. Auch die Einstellungen der Wärmepumpe werden während des ersten Winters auf die eigenen Wünsche angepasst.
Kontrollieren Alle Monat mal auf Sole- und Heizwasserdruck schauen, zusätzlich den Strom- und den Wärmemengenzähler überprüfen (auch für die WP-Verbrauchsdatenbank). Solevorlauf- und -rücklauftemperatur prüfen.
Weitererzählen Da das Prinzip des Ringgrabenkollektors in Deutschland bisher nur wenigen Personen bekannt ist fleißig Werbung machen ;-)
In order to use the TrenchPlanner please enter your password
Passwort